
If you’re running a business or intend to start a new one and want to promote your business, need a professional portfolio that will indulge people to learn more about you, or simply want to share your ideas, you might consider making your own website.
There are dozens of online platforms that can help you build and publish a website. But Google Sites makes the process simple, straightforward, and free.
To start with Google Site doesn’t require much technical knowledge. Google Sites provides a variety of templates to start with, all of which are completely customizable, so you can present your content in a manner that fascinates your customers.
If you need a ready to implement themes visit our collection. Or need custom design place an order on Fiverr
So, let’s dive into the core and will see how to get started.
How to start?
1. Sign into your Google account and go directly to the Google sites home page
Here, you will get options to start from scratch or go with a template that matches your interest.
Tip: To expand templates click on the ‘template gallery’ 
2. Select one of the template of your interest and you will be taken into the site editor.
As shown, in the top-left corner of site editor you will get options to change your site name and under the ‘insert’ tab on right side you can have all the building blocks required to make an astonishing site. By going to ‘Pages’ tab you can add more pages to your site and those pages are automatically included in to the site menu. And, you can change the existing theme by going to ‘Themes’ tab on the right hand side.
3. Using the ‘Insert’ Tab
By going to the ‘Insert’ tab you can get all types of predefined blocks. This can include text, photos, and other media. Add these items by clicking the relevant area on your template, and following the instructions on screen.
If you get confused, you can find a step-by-step history by clicking the three horizontally stacked dots in the top-right corner of your screen and then go to the version history.
4. Publishing your site
When you’ve added all relevant content to your site, hit “Publish” in the top-right.
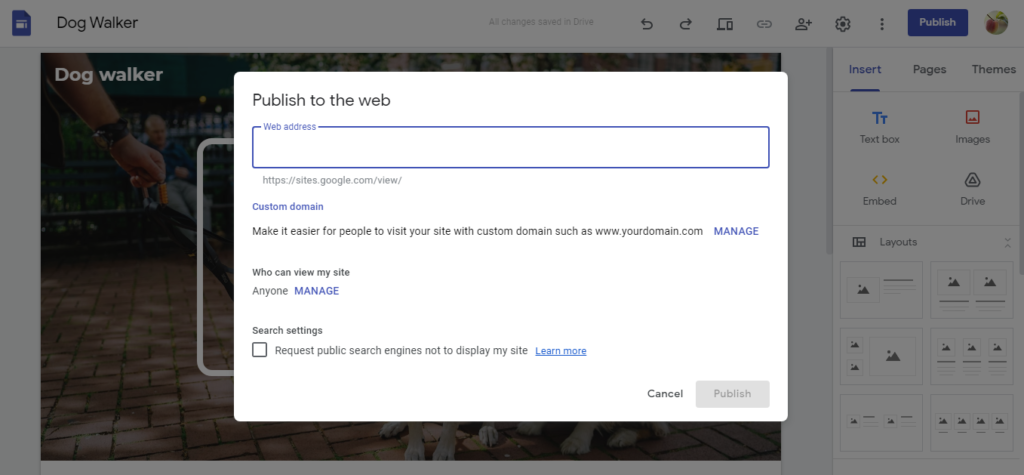
In the pop-up box that appears, choose the URL you want. However, you should note that by default, every Google Sites URL will begin with “https://sites.google.com/view.” In other words, if the URL you wanted was “makewebsiteonline,” your URL would be:
https://sites.google.com/view/makewebsiteonline
If you happen to own a custom URL already, put it into the “Custom URL” area. You can also set who’s allowed to see your site by going to ‘MANAGE’ section, and if it should appear in Google searches.